Add or Edit Profile Information for People and Groups
If authorized, you might be able to add or change profile information about groups or individuals in EMS Desktop Client.
To work with group or individual user profile information, you will:
- Open the Groups window.
- Search for existing Groups or Individuals.
- Add or Modify Basic Profile Information.
- Add or Modify Details for Groups/Individuals.
The values you specify here are become available when a new reservation is made for the group or individual. A user can change these values if needed during the booking process.
Open the Groups Window
- On the toolbar, click the Groups icon. The Groups window opens on the Results tab is the active tab, which lists the first 1000 groups in your EMS database that are Active.
-
See instructions in filtering and navigating the list of groups shown above.
Search for Existing Groups or Individuals
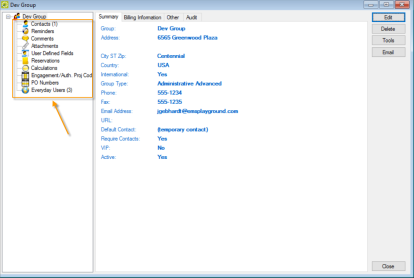
The profile page for the group or individual displays, dividing information into a left pane of hierarchical details about the group or individual, and a right pane showing basic information divided into four tabs: Summary, Billing Information, Other, and Audit.
- From the Groups window:
- To create a new group or individual profile, click the New button.
- To edit an existing one, find and select the group or individual profile you want to Edit and then click Open, and on the profile page, click Edit.
In the Dev Group window that appears, you can begin working with the basic profile information for the group or individual.
Add or Modify Basic Profile Information
- On each tab on the dialog shown above, and enter or change information as needed.
| FIELD | DESCRIPTION |
|---|---|
|
Name |
Required field. The name of the group. The name can be a maximum of 50 characters, including spaces. |
|
Address |
The street or mailing address for the group. |
|
International |
Select this option to drop the State and Zip fields for an international group. |
|
Phone Fax |
The phone number and fax number for the group. The Phone and Fax fields have a field available on which you can select a different value (Fax, Mobile, Other, or Phone) for the field label, or you can enter a user-defined value. To enter a user-defined value, double-click the current field label to select it, and then enter the user-defined value over the selected label. |
|
Email Address |
The email address for the group. If your computer is connected to a network, click Search to open a Global Address Lookup dialog and search for the email address. |
|
URL |
The URL for the group’s website. Web users can link to this group's website on the EMS Web App. |
|
Default Contact |
Populated with the name of the default contact for the group after you have defined default contacts for the group. |
|
Require Contacts |
Select this option if the group is to always require a contact when a reservation is being made for the group. |
|
VIP |
Select this option if the group is to be designated as a VIP group. |
|
Inactive |
Leave this option blank to add the group as an active group. Select this option to inactivate the group. |
Billing Information Tab
| OPTION | DESCRIPTION |
|---|---|
|
Pricing Plan |
Pick a pricing plan. |
|
Account |
Pick an account. |
|
Payment Type |
Pick a payment type. |
|
Salesperson |
Pick the salesperson for the event. |
|
Event Coordinator |
Pick the event coordinator for the group. |
|
Sales Category |
Pick a sales category. |
|
Status |
The status is a way to indicate the standing or ranking of the group. The default values are the following:
|
|
Billing Reference Number |
You can manually enter data into the field, or you can click the Search icon to open a master list of billing reference numbers and select a reference. |
|
PO Number |
You can manually enter data into the field, or you can click the Search icon to open a master list of PO Numbers and select a PO number. |
|
External Reference |
Links the group to an outside EMS Desktop Client, if needed. |
Other Tab
| OPTION | DESCRIPTION |
|---|---|
|
Network ID |
The Windows login for the group. |
|
Personnel Number |
Organization number for the group. |
|
Badge Number |
Badge number for the group. |
|
Other ID |
Any secondary ID for the group. |
- After you finalize the information, click OK.
Add or Modify Details for Groups/Individuals
- To begin this process, navigate to the group or individual profile page you want to work with (see Step 2 above).
From the profile page for the group or individual, you can work with details about a group from the left pane.
Adding and modifying information for a group or individual becomes fairly self-explanatory after the first few tries. This topic provides guidance and tips only where the workflow or field definitions might not be obvious, on the following types of information:
Add or Modify Contacts
-
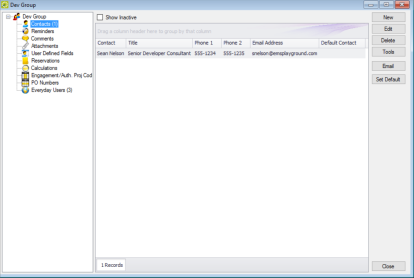
In the left pane, select Contacts. Contacts for the group show in the right pane of the window. When a reservation is being made for this group or individual, the contacts defined here will be available for selection.
-
To add a new contact, click New.
-
To modify an existing contact, select the contact and click Edit.
-
-
Enter or edit information for the contact as needed using the field definitions below.
You can set this contact as the default (First Contact) on new reservations for this group or individual using the Set as Default checkbox here or the Set Default button on list of contacts (above).
Field
Description
Contact
The name of the contact. The name can be a maximum of 50 characters, including spaces.
Title
The title (Mr., Ms., Dr., and so on) of the contact.
Group
Populated with the name of the group that you selected. You cannot change this value.
Address
Populated with the address of the group that you selected. If the contact address is not the same as the group address, then clear Use Group Address and enter the appropriate values in the Address fields.
International
Select this option to drop the State and Zip fields for an international group.
Phone
Fax
The phone number and fax number for the group.
The Phone and Fax fields have a field available on which you can select a different value (Fax, Mobile, Other, or Phone) for the field label, or you can enter a user-defined value. To enter a user-defined value, double-click the current field label to select it, and then enter the user-defined value over the selected label.
Email Address
The email address for the contact.
If your computer is connected to a network, you can click Search to open a Global Address lookup.
External Reference
Links the contact to an outside program if needed.
Notes
Any other information that is pertinent for the contact.
Set as Default
Select this option if the contact is to be the default contact for the selected group.
If a default contact has been defined for a group, then when you specify the group information for a reservation, the Contact field is automatically populated with the name of the default contact. You can always specify a contact as the default contact for a selected group at a later date. To do so, select the contact in the right pane, click Set Default, and then click Yes at the prompt to set the selected user as the default contact.
Inactive
Leave this option blank to add the contact as an active contact. Select this option to inactivate the contact.
-
When finished, click OK to return to the group profile page.
Add or Modify Reminders
- In the left pane, select Reminders; all reminders for the group or individual show on the right pane.
- Edit an existing reminder or create a New one.
Leave Date Completed blank so that the reminder shows on the Dashboard for the group or individual you are editing. In the Notes field, enter any further explanation or information about the reminder.
- When finished, click OK to return to the group profile page.
Add or Modify Comments
- In the left pane, select Comments; all reminders for the group or individual show on the right pane.
- Edit an existing comment or create a New one.
Choose a pre-configured Comment Type. If none of the pre-configured comment types meets your working needs, select (user specified comment), and then in the Description field, enter a description for the comment type. Select the Alert Users checkbox if you want the Alert to be highlighted on the group/individual dashboard.
- When finished, click OK to return to the group profile page.
Add or Modify Reservations
- In the left pane, select Reservations. All events for the group or individual show on the right pane.
Clicking New launches the Reservation Wizard. Selecting a reservation and clicking Open launches the Navigator. Clicking Reassign launches the dialog below, where you can assign the reservation to another Group or Individual.
- When finished, click OK to return to the group profile page.
Add or Modify Calculations
Calculations are additional charges that can be applied to billable items (a category, a group, a group type, a resource, or a room) such as gratuity or sales tax. Both pricing methods and calculations determine the final cost for a billable item; however, unlike pricing, which is applied when a billable item is reserved (and retained, even if the price for the item later changes), calculations are figured each time a confirmation or an invoice is generated. Assigning calculations to a Group or Individual profile means that they will be included automatically in any invoicing for this group or individual. See Also: Configure Calculations.
- In the left pane, select Calculations, and then click Edit. The Calculations dialog opens.
- On the Available list, use the Move arrows to move the selected calculations to the Selected list or visa versa.
- When finished, click OK to return to the group profile page.
Add or Modify Everyday Users
An everyday user is a registered user who can submit requests for reservations or schedule reservations in EMS Web App. When you add a new group or individual in your database, you decide the “level” of the group that you are adding. For a group that is added at the individual (personnel/employee) level, you might also need to create an everyday user from the group. This user can then create and view reservations on behalf of a group or groups in EMS Web App. You can create only one everyday user from a group. When you create an everyday user, you can also specify one or more delegates for the everyday user. A delegate is an everyday user who can create and view reservations on behalf of another everyday user.
- On the toolbar, click the Groups icon.

- Select the group for which you are creating the everyday user, then click Tools > Create Everyday User.
- Enter the information for the Everyday User.
Enter all the necessary information before saving. If you need to access your everyday user, on the EMS menu bar, click Configuration > Web > Everyday Users.
|
Field |
Description |
|---|---|
|
Name |
Automatically populated after you select the group from the Groups window. |
|
Password |
The password that an everyday user must enter to log in to EMS Web App. |
|
Email address |
If this information has been entered in the Groups window for the group, then this field is automatically populated after you select the group from the Groups window. If the field is blank, you must enter the full email address for the user. (The user must enter this address to log in to EMS Web App.) |
|
Phone/Fax |
Optional fields. If this information has been entered for the group, then these fields are automatically populated after you select the group from the Groups window. If the fields are blank, you can enter values if needed. |
|
Notes |
Optional field. |
|
External Reference |
Optional field. Links the everyday user to a group and/or HR Toolkit. |
|
Network ID |
Optional field. The everyday user’s network ID. |
|
Email Opt Out |
Select this option if the everyday user is not to receive automatic emails (such as reservation summary emails) from EMS Web App. The user will still receive manually sent emails. |
|
Status |
Required field. Select the status for the everyday user:
|
|
Security Template |
Required field. This determines the everyday user's access to the system—the menu items that the user can see and the information that the user can view in a tooltip when 'rolling-over' an event in EMS Web App. |
|
Time Zone |
Required field. Select the time zone for the user. |
Ideally, you should enter all the necessary information before saving; however, if you need to access your everyday user, on the EMS menu bar, click Configuration > Web > Everyday Users.
- Open the Process Templates tab and on the Available list, use the arrows to move button templates to the Selected list. An everyday user process template defines the functions that are available to each type of everyday user in EMS Web App when the user is submitting a request for a reservation
- Open the Groups tab and do one of the following to specify the groups on whose behalf the everyday user can view and make reservations in EMS Web App.
- The group (everyday user) is selected by default. You can leave this group in the Selected list, or you can select the group and click the Remove button (<).
- Specify any combination of search criteria for the Find field and Group Type, and then click Display to produce a list of all groups that meet the criteria. In the Available list, select a group, or CTRL-click to select multiple groups, and then click the Move button (>) to move the selected groups to the Selected list.
If you leave the Find field blank, then a list of all currently active groups for the selected group type is displayed. If you enter a search string in the Find field, the string is not case-sensitive, but your search is limited to the exact order of the characters in the string and it must begin with the information for which you are searching. For example, And returns Anderson, Scott, but not Cooper, Anderson.
- Open the Delegates tab, and in Search by, do one of the following to specify the delegates for the everyday user:
- Leave the Find field blank, and then click Display to open a list of all currently available Everyday Users. Select a user, or Ctrl-click to select multiple Everyday Users, and then click Move (>) to move the selected Everyday Users to the Selected list.
- In Search By, select the option by which to search (Email Address or User Name), and in the Find field, enter the string by which to filter your search, and then click Display. Select an everyday user, or Ctrl-click to select web multiple users, and then click Move (>) to move the selected users to the Selected list.
The string is not case-sensitive, but your search is limited to the exact order of the characters in the string and it must begin with the information for which you are searching. For example, if searching by Email Address, a search string of bob returns bob.worth@emssoftware.com but not dbobbett@emssoftware.com.
- You can click Spelling to spell check any information that you manually entered for the everyday user.
- Click OK. The dialog for creating an everyday user closes and a message opens indicating that the everyday user was created successfully.
- Click OK to close the message and return to the Groups window.
Assign a Group to an Everyday User
When you add a new group in your EMS database, you should also assign the group to an everyday user. This everyday user can then create and view reservations on behalf of the group in EMS Web App. You can assign a group to one or more Everyday Users.
- On the toolbar, click the Groups icon.
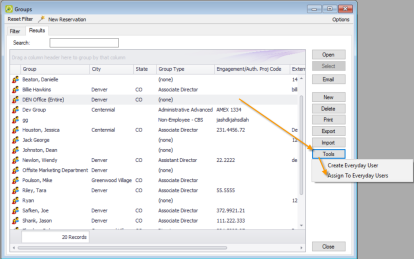
- Select the group you want to assign to Everyday Users, and then click Tools > Assign to Everyday Users. The Assign Group dialog opens.
- To assign Everyday Users to the group, find the users. Click Display to open a list of all currently active Everyday Users or Search By Email Address or User Name.
- Once you have found and selected the everyday user to assign, click the Move button (>) to move the selected users to the Selected list.
- Click Finish. A success message opens.
- Click OK.