Install or Upgrade the EMS Master Calendar Import Service
If using a data connector to import a tab delimited and/or XML file, one must set the temporary location, and SMTP server information when setting up the data connecter service. This allows for the importing of the file and also the generating of an email to notify the individual, who defined the import, the status and result from the import.
Import file specifications can be found by logging into the EMS Master Calendar system as a site system administrator, navigating to Admin > Events & Special Dates > Import Events > Add New > Import file specifications.
Existing versions of the Master Calendar Import Service must be manually uninstalled, through the Add or Remove Programs menu, prior to upgrading the EMS Master Calendar Import Service to a newer version.
- Download the DEAMasterCalendarImportSetup.msi onto the server that will be running the service.
-
Double-click DEAMasterCalendarImportSetup.msi. Follow the on-screen prompts. We recommend accepting the default settings.
-
Within the Microsoft Windows Start menu, locate EMS Master Calendar Import Service > Import Service Configuration Settings.
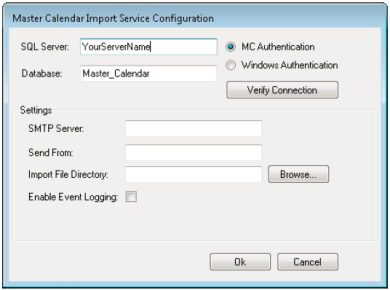
The Master Calendar Import Service Configuration screen opens.
- Enter in the SQL Server name of where the EMS Master Calendar Database resides on.
- Enter in the database name that was provided for the Master Calendar Database. By default, the database name should be ‘Master_Calendar’ unless manually changed.
-
Click Verify Connection to confirm that the Import Service has connected to the EMS Master Calendar Database.
- In addition the following can be configured:
- SMTP Server – SMTP name or IP Address
Send From – An active email address that will be displayed in the Send From field of the notification emails that are sent out.
-
In Import File Directory, enter or browse for a physical path of the directory the import files will be downloaded.
The path entered for the Import File Directory must be an existing directory and end in a backslash. For example: D:\Temp\.
- Select if Error Logging should be enabled.
- After filling in the information above, click OK to save the settings.
If you encounter issues starting the service, visit the Knowledge Base available in Accruent Access for a possible solution or contact Customer Support.