Install or Upgrade the EMS Campus Web Service
This topic covers the steps you need to follow to install the EMS Campus Web Service or upgrade an already existing installation.
 Install the EMS Campus Web Service (new installations)
When the Campus Web Service .msi installer completes an install, it checks the server for .NET Framework 3.5. It attempts to install it if it's missing from the server, but doesn't have permission to install it. This produces an error.
You can disregard this error as it is not required for Campus Web Service to function.
-
Verify the prerequisite software has been installed.
-
Verify the View.sql file has been executed against your SIS database.
This is required for both first time installations and upgrades.
-
Download the EMSCampusWebService.msi file onto the web server that will be running the web service.
-
Run EMSCampusWebService.msi.
-
The EMS Campus Web Service Setup Wizard opens.
-
To begin the installation process, click Next.
The Select Installation Address page opens.
-
Select the Site, Virtual Directory, and Application Pool.
We recommend that you keep the default settings. The installation process creates a Physical and Virtual directory on your web server named EMSCampusWebService or the value you entered in the Virtual Directory field.
The EMS Campus Web Service must not be installed in the same Virtual Directory as other EMS web-based products.
-
Click Next.
The Confirm Installation page opens.
-
Click Next.
The SIS Settings page opens. If .NET framework 3.5 is not installed, you get an error message about an unhandled exception. You need to update the connection strings manually.
-
In the message window, click Quit.
-
On the main installer page that displays, click Finish.
The EMS Campus Web Service gets installed.
-
Navigate to the directory you installed EMS Campus Web Service and find the web.config file to add the relevant connection string properties.
- In the Get data from pane, choose either Flat File or SIS/CRM based on your SIS data source.
- Flat File
Select if you will be outputting your SIS data to tab-delimited files. The EMS Campus Web Service will connect to and read information from these files which must conform to a specific format. See Appendix A for file format specifications. If you choose this option, skip to Step 17.
- SIS/CRM
Select if EMS Campus will be tied directly to your SIS database. The EMS Campus Web Service will connect directly to and read information from your SIS.
- Flat File
- In the SIS/CRM Settings pane, select your Connection Type based on the Database Management System your SIS uses:
- SQLClient – MS SQL Server
- OracleClient – Oracle
- ODBC – Other ODBC-compliant database
- Select your Connection Method.
- Data Source Name – The DSN for your SIS database if you selected OracleClient or ODBC. This option requires an ODBC Data Source created via the ODBC Data Source Administrator.
- Server / Database – Your SIS server name and database name if you selected SQLClient.
-
Enter the User ID / Password for your SIS.
The account created in the Installing the EMS Campus Views section in this document must be used.
-
Click the Verify Connection button to confirm successful connection to your SIS database.
-
In the EMS Settings pane, enter your EMS Server Name / Database Name.
-
Click the Verify Connection button to confirm a successful connection to your EMS Campus database.
-
Click Done.
The Installation Complete page opens.
-
Click Close.
EMS Campus clients using the tab-delimited file option must skip to Step 25.
-
Secure the Queries.xml file provided by your Client Services Consultant.
-
On your web server, navigate to the CustomConfig folder within your EMS Campus Web Service directory.
This typically is C:\Inetpub\wwwroot\EMSCampusWebService\CustomConfig.
-
Replace the existing Queries.xml file with the new Queries.xml file required for new EMS Campus installations and upgrades.
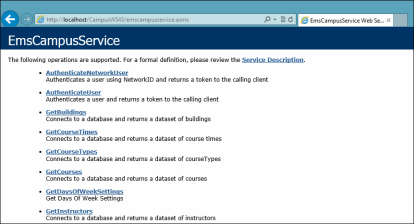
- Verify your installation by opening a browser and entering the following URL:
http://[ServerName]/EMSCampusWebService/EMSCampusService.asmx.
Replace [ServerName] with the name of your web server. The following page appears:

Upgrade the EMS Campus Web Service
An upgrade of the Campus Web Service requires all campus customers to uninstall and reinstall the EMS Campus Web Service.
In order to do this correctly and ensure that you don’t run into issues with the connection to your SIS and can query the SIS database successfully.
-
Copy the Web.Config file in the folder the application is installed (\EMSCampusWebService\web.config and save it to a location that can be accessed later.
-
Copy the Queries.xml file in the same folder the application is installed (\EMSCampusWebService\CustomConfig\Queries.xml) and save it to a location that can be accessed later.
-
Uninstall the EMSCampusWebService.
-
Install the newest EMSCampusWebService.
You can bypass the SIS Connection Setup Window that comes up as it is used for new customers. The Web.Config file you saved will have your specific SIS Connection information that you need.
-
Replace the Web.Config file you saved earlier in Step 1 in the folder the EMSCampusWebService is installed.
This has the information you bypassed in Step 4.
-
Replace the Queries.xml file you saved earlier in Step 2 in the CustomConfig folder the EMSCampusWebService is installed.
This is specific to your SIS so you can either rename the default file that just got installed or overwrite it.
To test whether you successfully followed the above steps:
Navigate to Desktop Client > Academic Planning > Synchronize Buildings.
If you see a list of buildings that match what you have in your SIS, you are done. If this results in an error message or does not look correct, contact EMS Support for help.